Wednesday, March 14, 2018

Homemade Paper and Cardboard Slide Projector


This is a slide projector made mostly out of paper and cardboard. A slide projector consists of a bright light source (in my model, a spotlight) , a slot for inserting a slide and a movable lens. By moving the lens, the image present on the slide can be focused and projected on a screen.

This is not he first time I am making a slide projector. My first attempt in making a slide projector was many years ago when I was in third or fourth grade. I made the slide projector with my mother's help. I learned to make the model from a YouTube video by YouTube channel which goes by the name nicebraga.

nicebraga's YouTube video:

https://www.youtube.com/watch?v=6-MnUGVrbTw

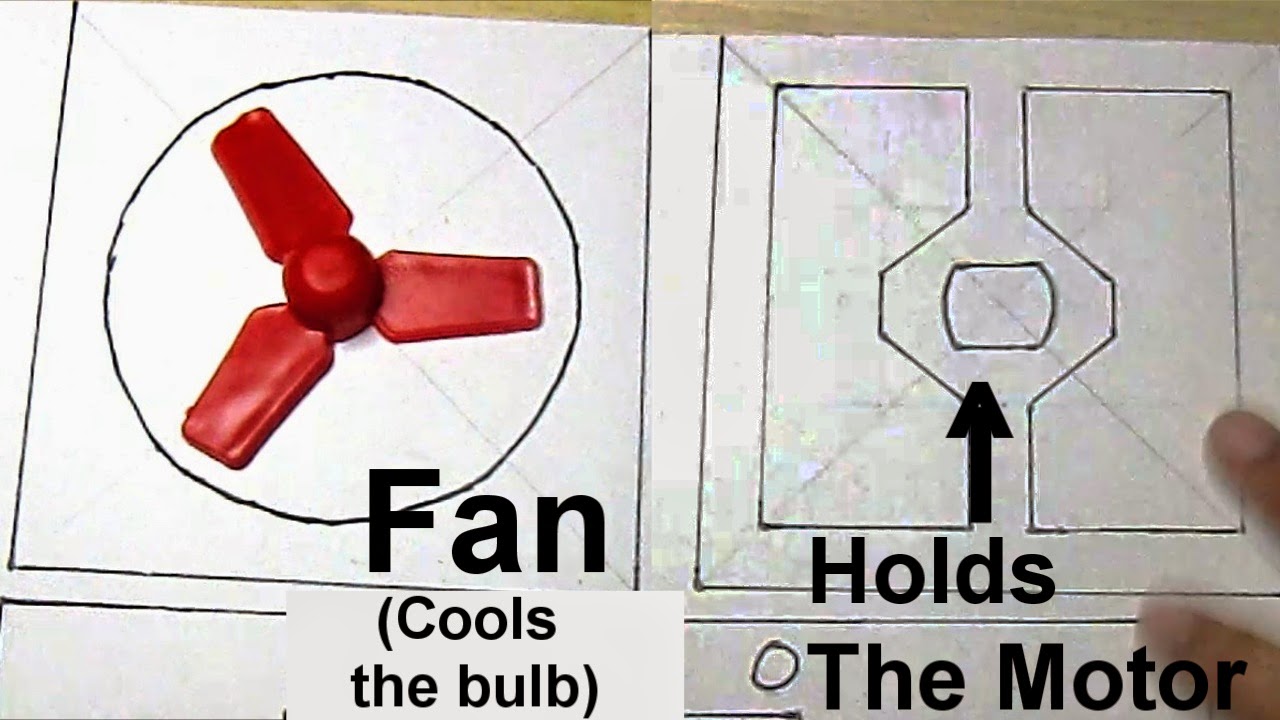
The first projector I made was very similar to the video in nicbraga's channel. Except I made mine out of cardboard and Styrofoam. What I observed in this model was that the sides were open and light would spill out. While the projectors sold in the markets would be like boxes with light coming out only from the front through the lens. That is what made me want to start this project. I wanted the projector to be like a box with the sides covered to avoid light spills. Since the projector was going to be in a box, there was the question of heat accumulating within the box. So I realised that I would have to put a fan in the projector.

The technique that I used to make this projector with was that of making hard-paper. This is a method I learned from another YouTube channel which goes by the name Tacome1942. The idea is that if you stick many layers of paper together with glue it gets really hard. The more the layers, the harder it gets.I have written a blogpost about this:

http://arvind-ravikumar.blogspot.in/2012/05/paper-or-wood.html

Another idea that I learned from him was the idea that you can use paperclips to strengthen the paper pieces that you make. The paper clip is bent into shape with the help of pliers and then placed in between the layers. I am not fully sure as to whether I performed this technique correctly but I did it anyway.

Tacome1942's YouTube Channel:

https://www.youtube.com/user/Tacome1942

Here is the video showing how the projector works:


If you are interested in seeing the steps I took to build this you can watch the series of videos that I have posted on YouTube:

Part 1: https://www.youtube.com/watch?v=dB-S40gTmNM

Sunday, July 6, 2014

Paper and Cardboard Slide Projector - Plans and Sneak-Peak shots

Here is a new project I am working on. I have made a slide projector before but everything was open (allowing light to spill everywhere) and lenses were seated on a really long rail. This time I want to put all the electronic items within a box. So here is a picture of the plans I have drawn.


Overview


Piece which holds the slide


Pieces which make the slot for the slide

Pieces which hold the fan


Back portion of the projector


Sneak Peak Shots of the Projector


Videos of the project will be uploaded when the project is finished. Just like my previous projects there will be many parts so that you get a good idea of how I made this. 

Friday, October 11, 2013

YouTube Channel Update: "The Handmades Show"

Hey guys! I have now decided to call my YouTube Channel "Handmades" where we 'Make Something That Does Something'


This means that I won't be sticking to just making crossbows. I will also be branching out to other things. But all the things I make will definitely do something (directly or indirectly) rather than just sit in one place.

I am planning to make this into a show where I will (hopefully) be uploading videos in a schedule making a lot more stuff (I cannot guarantee it although)

All the techniques or ideas used in the show may not be mine and I shall credit he respective person for the idea or technique.

I hope you like this change I am making to the channel. I shall upload the next video soon.


Homemade Paper Pistol Crossbow (new trigger mechanism)


When I was building this crossbow I was expecting it to be an accurate one but apparently I was wrong. You may remember the last pistol crossbow I built and may be wondering why I made another one. I was trying to test out this new trigger mechanism where the string is held by a notch and the trigger pushes the string out of it.


Long ago I had actually tried this out and it did not work. After seeing it work for so many other people I decide to try it out again. The problem was that only one portion of the string would come out (right or left). This time I solve the problem by making the string rigid by attaching a toothpick. It works better but still did not work as well I wanted it to. The problem still occurs once in a while.

Is the weapon accurate? No. The weapon is not accurate at all. This means that the sighting system I attached was completely useless. Even my old weapons have lost their accuracy. Initially the old pistol crossbow was accurate. But now, the accuracy is gone. The Medieval Style crossbow was accurate for a while too. But now, the accuracy is gone. I am still not sure what exactly makes a weapon accurate.

Well even though is was not accurate, the weapon is quite strong with three rubber bands per side. I did have a lot of fun building it and I think it does look kind-of cool.

I must give credit to The Slingshot Channel and Weapon Collector as I got many of the ideas from their videos. (The sighting system was created by Weapon Collector)

If you want to watch the making of the crossbow click the link.

Making a Paper and Cardboard Pistol Crossbow (new trigger mechanism) Part 1

Monday, December 10, 2012

Plans for the Pistol Crossbow

Here are the Plans for the Pistol Crossbow. Download these, and you can follow along with the videos


Click here for Part 1:

Plans for the Paper Medieval Style Crossbow

Here are the plans for the Paper Medieval Style Crossbow. download these and you can build your own Paper Medieval Style Crossbow by following the videos.


for the first part click:

http://www.youtube.com/watch?v=Fl4PzoCVkSc

Friday, October 5, 2012

Homemade Paper Medieval Style Crossbow

Homemade Paper Medieval Style Crossbow. The only items that I have used to make this are: Paper, Cardboard,Tape and Screws. Took me nearly about a month to make. Take a look at the pictures to get a rough idea on how I made the crossbow.

1.Made 9 rolls of paper and stuck them together in the form of three layers (1 layer = 3 rolls).
http://www.youtube.com/watch?v=Fl4PzoCVkSc&feature=channel&list=UL

2. Cut two pieces of cardboard in the shape of the stock and glued them together and stuck pieces of newspaper on the sides. then I made two such pieces.
http://www.youtube.com/watch?v=gNVKxlbtH_w&feature=channel&list=UL


3. Glued the rolls to one piece of the cardboard stock and added few layers of card board in the front.
http://www.youtube.com/watch?v=gNVKxlbtH_w&feature=channel&list=UL


4. Made the nut. Made it such that there is an opening in the middle so that the bolt/arrow can fit through.
http://www.youtube.com/watch?v=gNVKxlbtH_w&feature=channel&list=UL


5. Made the tickler/trigger by sticking 64 layers (6 sets of 8 layers) together in the shape of the trigger.
http://www.youtube.com/watch?v=gNVKxlbtH_w&feature=channel&list=UL


6. Made holes in the cardboard for the trigger an nut. Used sticks to hold trigger and nut. Added layers of cardboard for spacing between the 2 pieces of the stock and between the trigger and nut and the stock. Used a spring to add tension to the trigger.
http://www.youtube.com/watch?v=gNVKxlbtH_w&feature=channel&list=UL


7. Covered all the sides with 10 layers of paper (except the top railing part). Top railing part was covered with 1 layer of paper. The sticks could not tolerate the pressure from the rubber bands and hence broke. So I used screws instead.
http://www.youtube.com/watch?v=L6VZjapkMSY&feature=relmfu


8. The 'sight block' (1st image) was made by sticking layers and layers of cardboard together until it had the desired thickness. Then a slot was made over the sight block in order to hold the arrow holder.
    The 'arrow holder' consists of a rectangular piece of 16 layers of paper with a curved/bent strip of  16 layers of paper. This bent strip holds the bolt/arrow down. The arrow holder can be fit on to the sight block by pushing it through the slot made over the sight block.
http://www.youtube.com/watch?v=L6VZjapkMSY&feature=relmfu


9. The rails were made by sticking two strips of cardboard side-by-side over the railing part.These strips were then covered with one layer of paper. The bolt/arrow can slide smoothly over the railing and can fit through the gap made in the nut.
http://www.youtube.com/watch?v=L6VZjapkMSY&feature=relmfu

10. The stock is finished

11. To know how the prod was made, watch:
http://www.youtube.com/watch?v=P7wCFSrbTzM&feature=channel&list=UL


12.All pieces are painted

The Homemade Paper Medieval Style Crossbow


The crossbow consists of three rubber bands per side and is quite strong. It can shoot straight up to a range of 15 feet. When the weapon was just made it was quite accurate.but now it can only hit an area within a radius of about 6-8 inches. I also have to say that this is the first weapon that I have built which has a curvy shape. This crossbow is called a Medieval Style Crossbow because it resembles the crossbows used in the medieval times. Except that my crossbow is made out of paper and is powered by rubber bands.

Homemade Paper Medieval Style Crossbow (Slingshot)